A step-by-step guide to minting NFTs for beginners
NFTs (Non-Fungible Tokens) are the new wave in the cryptocurrency space. Over the last few months, they have opened up new channels for digital creators to monetize their work.
An NFT is basically a record of a unique item on the blockchain. You can make an NFT for anything; art, music, memes, even a selfie. NFTs can be sold and traded by people all over the world, and their sale recorded on the blockchain. While these digital items can be copied and used by other people on the internet, the appeal of owning an NFT is that there remains a permanent record on the blockchain of the creator of the art, its current owner and the chain of ownership.
Whether or not you think this is a bubble, the technology and its potential use cases are very promising. As the world becomes increasingly digital, the ability to prove ownership i.e. provenance of digital assets is critical for ensuring that creators can earn and be recognized for their work. NFTs enable this to happen in a way that is borderless and permissionless; a creator in Nigeria can sell her work for millions of dollars to a pseudonymous stranger across the world without a middleman. They also present interesting new ways for people to collaborate on and use digital assets.
In Nigeria, over the last few weeks, there has been a lot of interest in this space, but also a lot of confusion as people don’t know where to start. This article is specifically for digital artists who have already examined the pros and cons and have decided that they would like to create an NFT and sell their art on the blockchain.
In this article, I detail the steps you need to follow to create an NFT as a digital artist in Nigeria even if you don’t own or have never used crypto. I’ve also added screenshots so you can follow along.
If you’re totally new to NFTs, here’s a good primer about what they are and why they’re important.
Let’s get to it!
Step 1: Create your art
Do what you do best and create amazing art. Feel free to play with different forms of digital media and themes — 3D illustrations, audio, abstract, hyperrealistic, whimsical, political — all kinds of works sell as NFTs. Beeple’s The First 5000 Everydays, CryptoPunk 7804 and 3LAU’s NFT album are three of the current best selling NFTs and they are all very different. Let your creativity run wild, you’re the expert here.
“CryptoPunk 7804” was recently sold for 4,200 ETH (~ $7.8m)
Step 2: Buy Ether
Ether (or ETH) is the cryptocurrency of the Ethereum blockchain. At the moment, most of the NFT action is happening on Ethereum so in this article, when I mention blockchain, I’m referring to the Ethereum blockchain.
When you mint your art as an NFT, you’re essentially creating a record on the blockchain about that piece of art. The record will show you (your wallet address) as the creator and owner of this work. This record cannot be changed or erased. Even as your art gets sold (and resold), there will always be this initial record of you as the creator and initial owner of the NFT as well as accurate records of everyone who has ever owned it. This record is publicly accessible and everyone can see it on the blockchain.
To create this record (called a transaction), you need to pay fees known as gas. The gas fees fluctuate based on the level of demand for transactions to be created on the blockchain. At the time of this article, the gas fee for minting NFTs is about $70.
So, before attempting to mint your NFT, you’ll need to buy some ETH to pay as gas. You can buy ETH with Naira from any local cryptocurrency exchange, I recommend BuyCoins :)
As with all cryptocurrencies, you can buy ETH in small bits. On BuyCoins, you can buy as little as 0.005 ETH (which is currently worth about N4,500 or $9). Here’s a guide on buying ETH from BuyCoins with Naira.
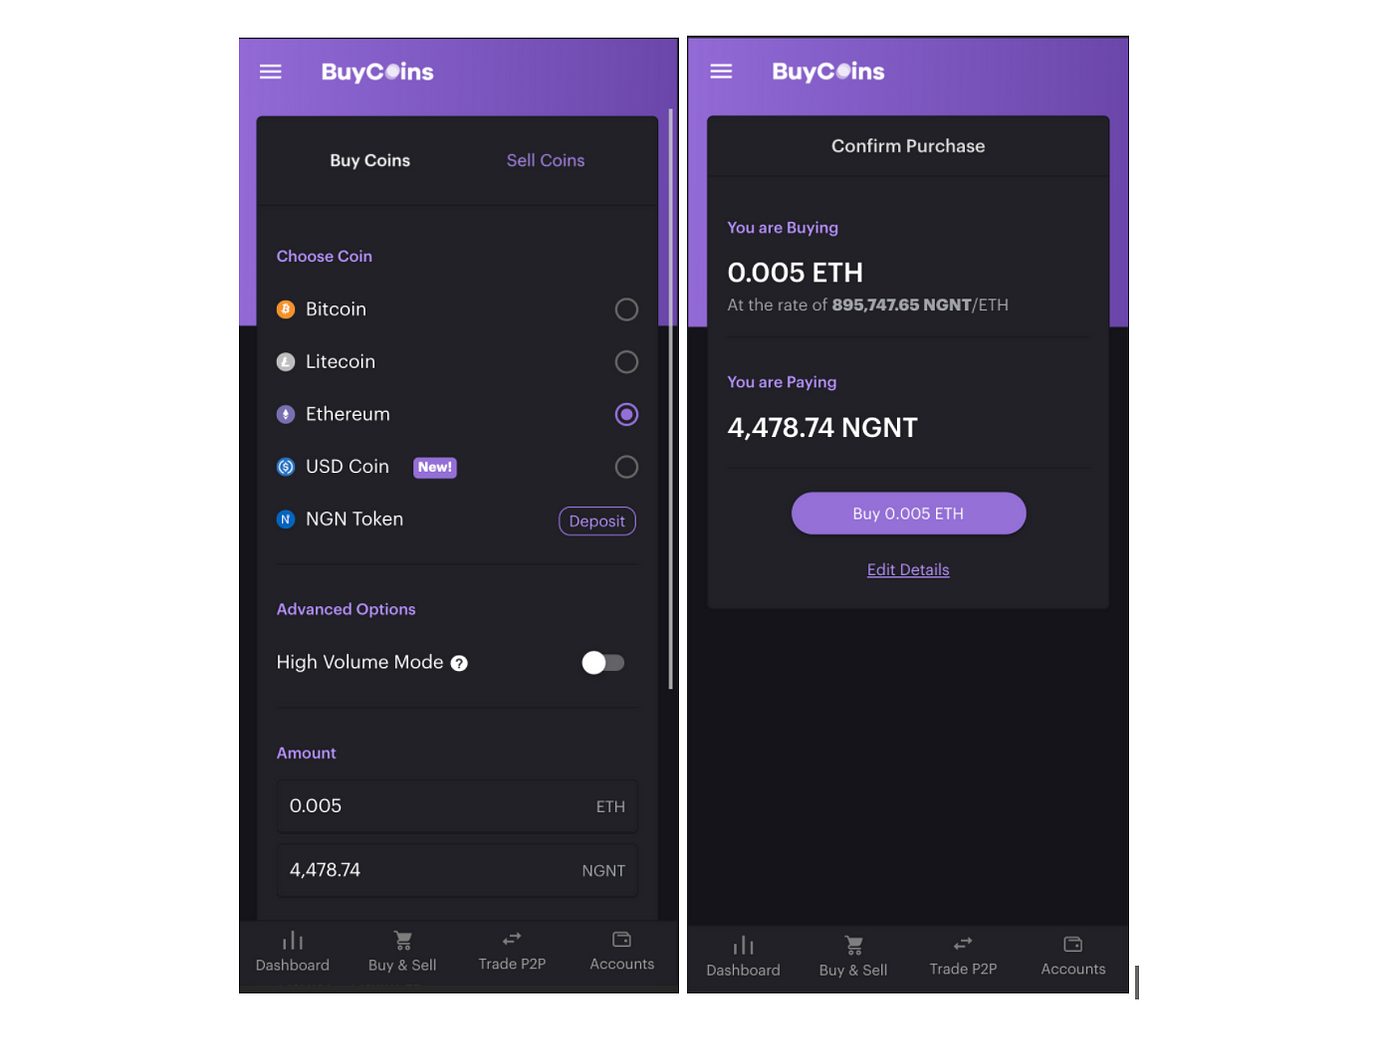
Buy Ether on BuyCoins
Step 3: Set up your non-custodial Ethereum wallet
To connect to NFT marketplaces to mint and sell your work, you need a non-custodial wallet. A non-custodial wallet is a type of cryptocurrency wallet (an account for storing and transacting crypto) that gives you total control of your funds. This is different from the type of wallet that is owned and managed by a centralized crypto exchange (e.g BuyCoins) on your behalf; a custodial wallet.
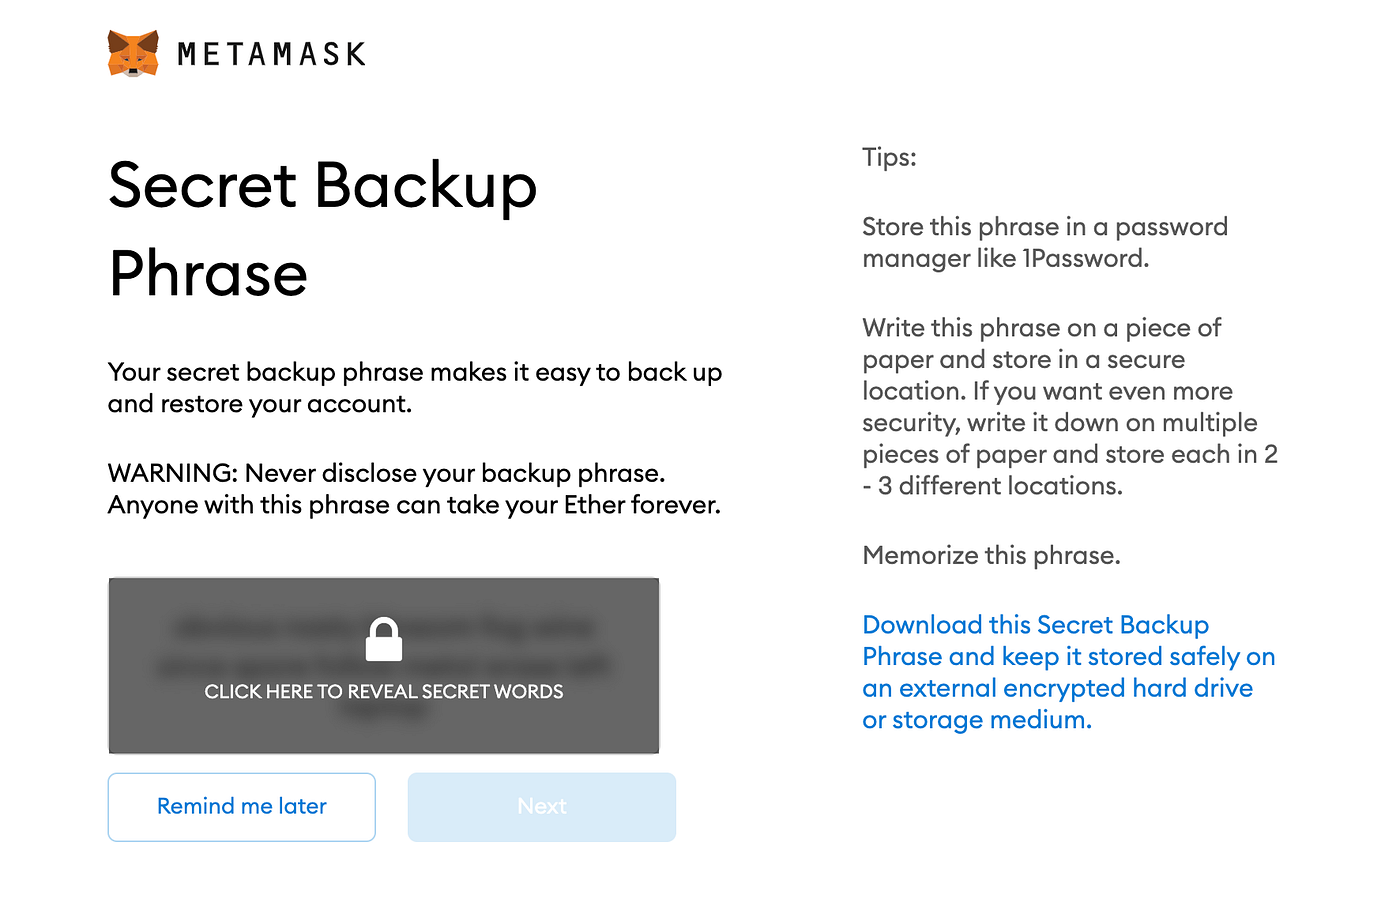
With a non-custodial wallet, you have access to the* seed phrase*, a random 12-word combination that enables you to back up your wallet and access it on multiple devices or platforms. This means that no exchange can block or restrict access to your funds.
This level of freedom comes with a huge responsibility. If you lose your seed phrase, you’ll also lose access to your funds and won’t be able to recover them.
There are numerous non-custodial wallets that can be used on mobile or the web. On mobile, there’s Coinbase Wallet (Not to be confused with the Coinbase App) and Rainbow. If you’re using a laptop, you’ll need to get a non-custodial wallet like Metamask or TrustWallet that is compatible with web browsers.
In this article, I’m demonstrating with Metamask.
Setting up Metamask
- Visit www.metamask.io and install the chrome extension.
- Click “Create a Wallet”

- Follow the next set of prompts to create a password (this is not your seed phrase).
- Next, copy your seed phrase — keep it somewhere safe and memorable. Like I mentioned earlier, if you lose your seed phrase, you’ll lose access to your crypto. Metamask (or your preferred non-custodial wallet) cannot recover it for you. Anyone who has access to your seed phrase can send crypto out of your wallet, so you need to ensure that no one else can access it.
- Click “Next” and complete the setup.
Step 4: Move Ether to your non-custodial wallet
Next, you’ll need to move your Ether from the wallet on BuyCoins to the non-custodial wallet that you set up in the previous step.
For this, you need to get your wallet address. Your wallet address is basically like your account number. In this case, it allows you to receive and send crypto from one wallet to another. On your Metamask wallet, you can copy your wallet address from the top of the page.
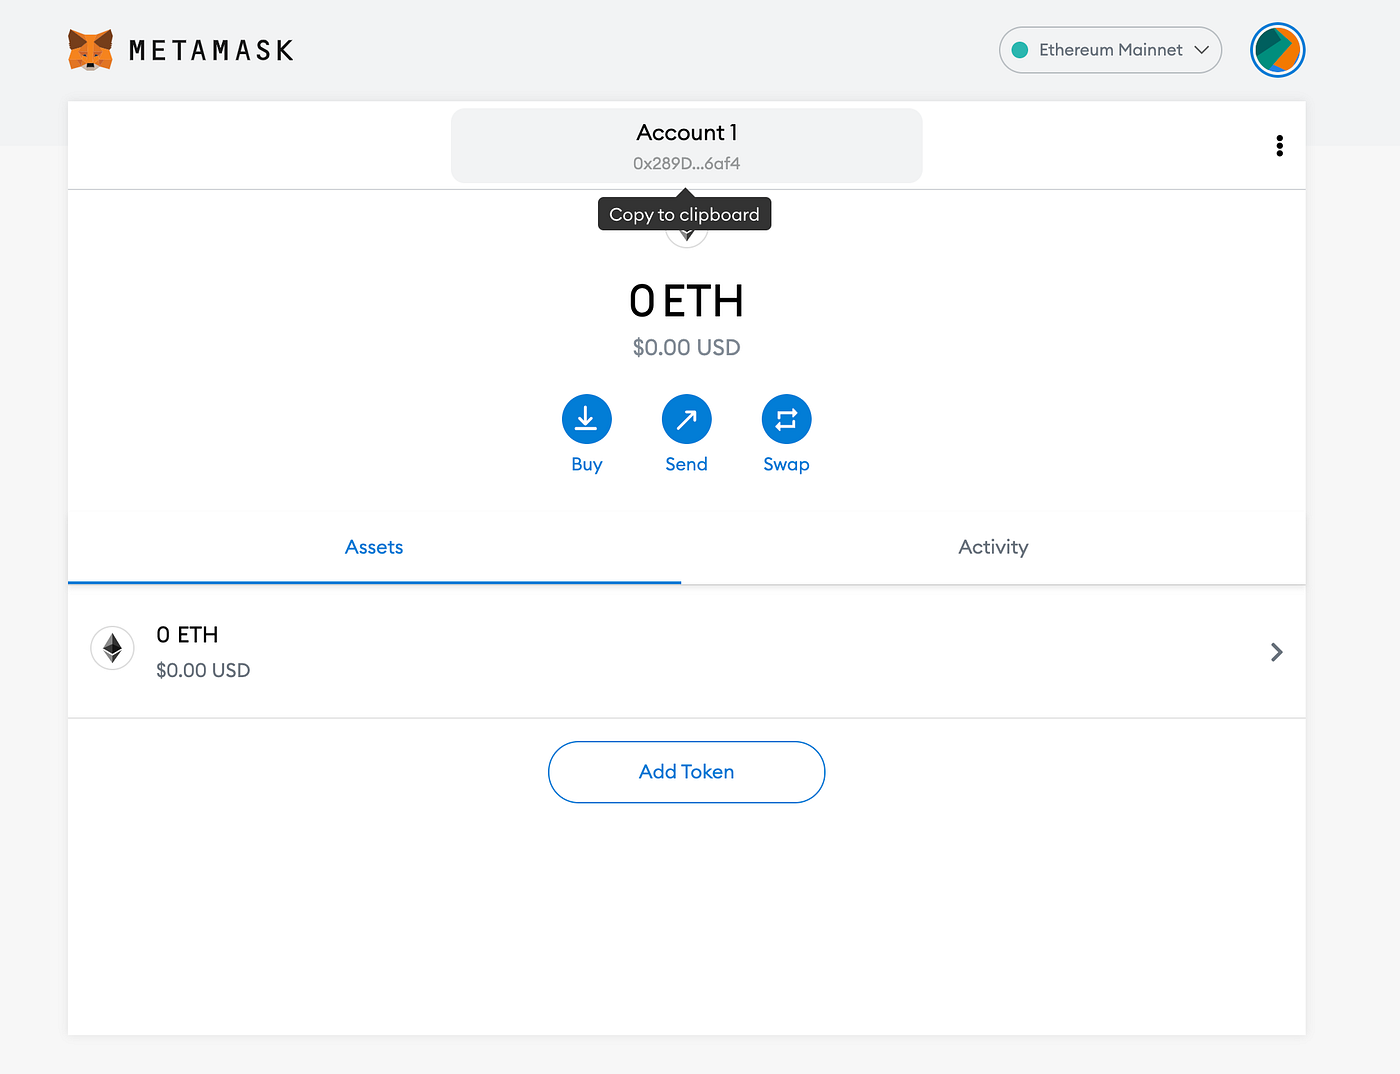
Copy your wallet address
On BuyCoins (or your crypto exchange wallet), send the value of the ETH you’ve bought to the wallet address. Here’s a guide to sending ETH on BuyCoins.

When the ETH arrives in your Metamask wallet, you’ll see that your balance is updated.

Step 5: Choose a platform to mint your NFT on
The choice of the platform is dependent on a lot of different factors. So far I’ve tried minting on Rarible and OpenSea. They are both relatively easy to use.
I prefer OpenSea because, unlike other platforms, you don’t have to pay minting fees every time you create a new NFT. You only need to pay the first time, when you set up your collection. For subsequent NFTs, the gas fees will be paid by the buyer of your work.
Once you mint your NFT, it is stored in your wallet and you can sell it on any platform. So, if you mint on OpenSea and then connect your wallet to Rarible, you’ll be able to sell there as well.
Step 6: Create your NFT on the platform
This is surprisingly the easiest part. Most of the platforms have greatly simplified the process, so you can create your NFT in just a few clicks.
- Visit www.opensea.io and click “Create”. You’ll get a prompt to sign in to your Metamask wallet.

Viola!
Step 7: List the Art for Sale
Set your preferred sell method. You can either set a price, put it up for auction or bundle it with your other NFTs to sell. For the “Price” option, you can set the price in ETH, DAI or USDC. DAI and USDC are dollar stablecoins — cryptocurrencies whose value is always the same as a dollar. Basically, 1 USDC = 1 USD and 1 DAI = 1 USD.
You can set the price in ETH and select the “Highest Bid” option to ensure that your art is sold to the highest bidder.
Next, you’ll get a prompt to confirm the transaction and will need to pay the quoted amount as gas fees to continue. Once you click confirm, it will be deducted from your Metamask wallet and OpenSea will list your art as an NFT.
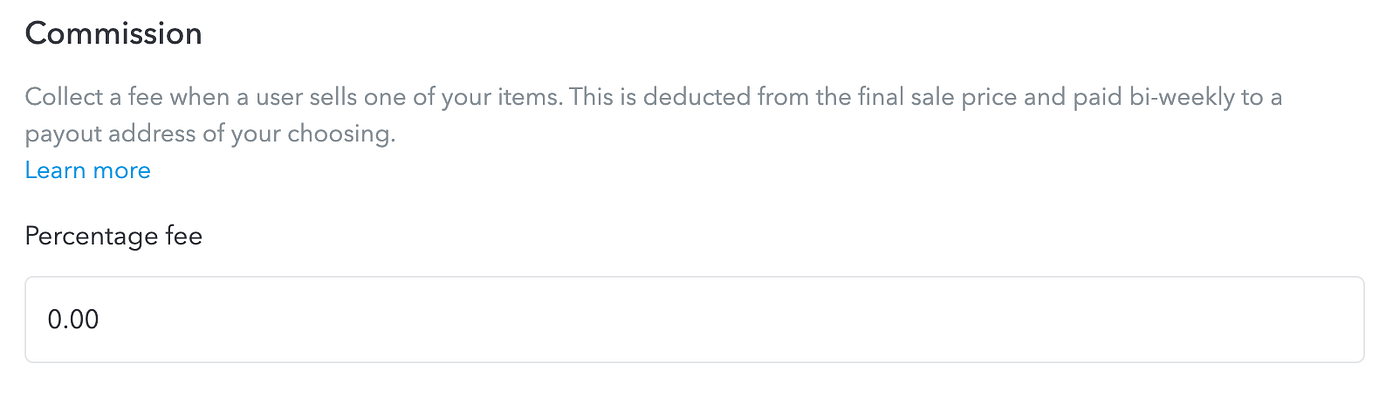
Step 8: Set your royalties on Secondary Sales (Optional)
Unlike other forms of digital art, you can make money from secondary sales of your art in perpetuity. Basically, you can set a percentage that comes to you every time your art is resold. On OpenSea, you set this percentage on the collection.
To do this, click on the “Edit” button beside your collection and scroll down. Set a percentage as your commission and save your settings.
Set your commission on secondary sales
…And you’re done. You’ve minted your first NFT on the blockchain. Now to the fun part; share it with other people and discover the endless possibilities of creating on the blockchain.
If you found this helpful, remember to share it with others. If you have any specific questions about NFTs and crypto, you can email me at hey@tejumade.xyz. I’ll try to answer it in the next article I write.